 Every profession has its own language, but few seem more mysterious to the uninitiated than that of welders.
As our towns and cities age, the talents of welders will be needed more than ever. Welders will be rebuilding our bridges, buildings and roads, and they follow instructions and document their work using standardized symbols.
The recently revised BS EN ISO 2553:2019, Welding and allied processes – Symbolic representation on drawings – Welded joints, is one of the two most commonly used standards for welding symbols worldwide.
BS EN ISO 2553:2019 enables welders and those who work with them to:
- make consistent welding symbols in drawings within their organization;
- give clear, unequivocal, and standardized requirements on joint type, geometry, dimensions, and other complementary information within their organization or to external contractors; and
- avoid costly mistakes due to misinterpretation of drawings, especially those that are part of contractual documents.
Here's an insight into the language that welders need to know.
Welding symbols – when and how to use them
The symbols in the standard can be used on technical drawings for welded components. They can indicate type, thickness, length of weld, weld quality, surface treatment, filler material and testing specifications.
If necessary, clarity can be improved by reference to further information in the drawings or other documents.
Welding symbols – introduction
All symbols must contain a reference line and an arrow line.
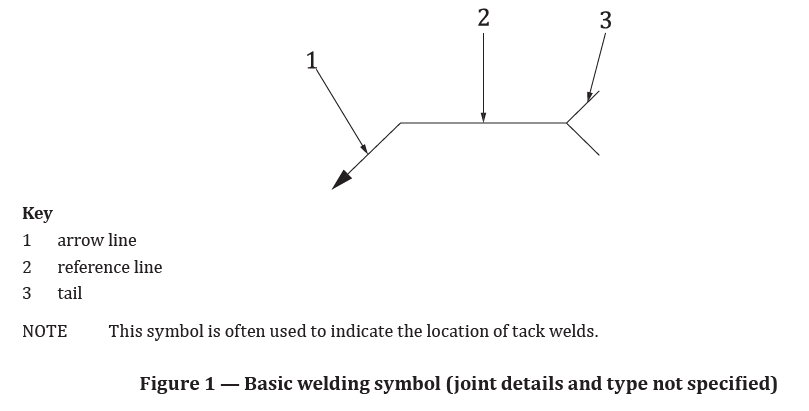
The basic welding symbol comprises an arrow line, a reference line and a tail. This indicates that a joint is to be welded but gives no further specifications (see Figure 1).

There may also be additional elements to convey specific information. The thickness of all these, plus any lettering, should be in accordance with ISO 128 (all parts) and ISO 3098-2.
The welding symbol is best shown on the arrow side of the joint, where the weld is to be made.
Reference to notes can be used to keep the drawings uncluttered.
This standard recognizes two systems to designate the arrow side and the other side: A and B. System A is based on a dual reference line consisting of a continuous line and a dashed line, whereas System B has just one reference line.
Below are five elements that may be included in a welder's diagram.
1. Elementary symbols
These may be added to the reference line to indicate the type of weld, and are generally drawn at the mid-point. They are listed in Table 1 of the standard.
Elementary symbols can be combined to convey particular configurations. If the symbols cannot convey the necessary information clearly, there may also be a drawing of the cross-section of the weld and its dimensions.
For double-sided butt welds, the symbols should be drawn on opposite sides of the reference line.
2. Supplementary symbols
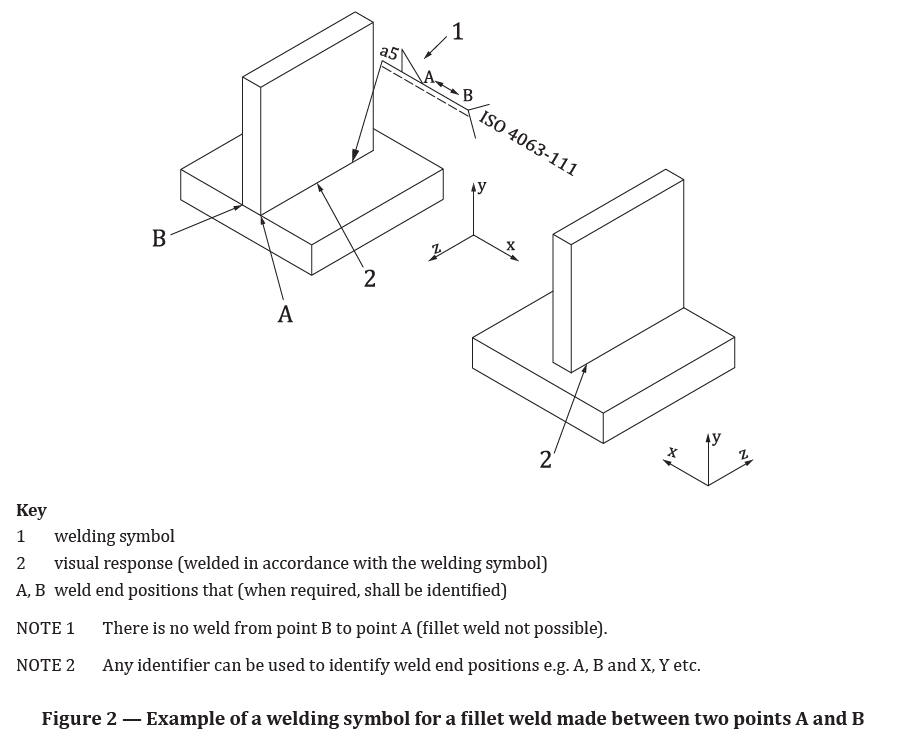
These provide additional information – for example about the shape of the weld or how it should be made. Table 3 contains details of all supplementary symbols. It includes the weld-all-around symbol, which designates a continuous weld around a series of joints, and the weld between two points symbol (see Figure 2).

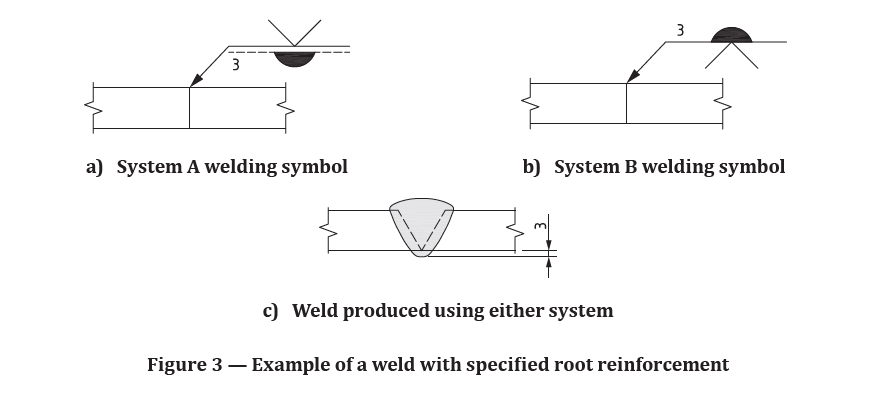
Field welds, root reinforcements, and welds on flanged butt and flanged corner joints are also covered (see Figure 3).

3. Arrow line
The arrow line indicates the joint to be welded.
- It points to, and touches, a solid line that is part of the joint on the drawing.
- It is drawn at an angle to, and joined to, a reference line.
- It is completed with a closed, filled arrowhead.
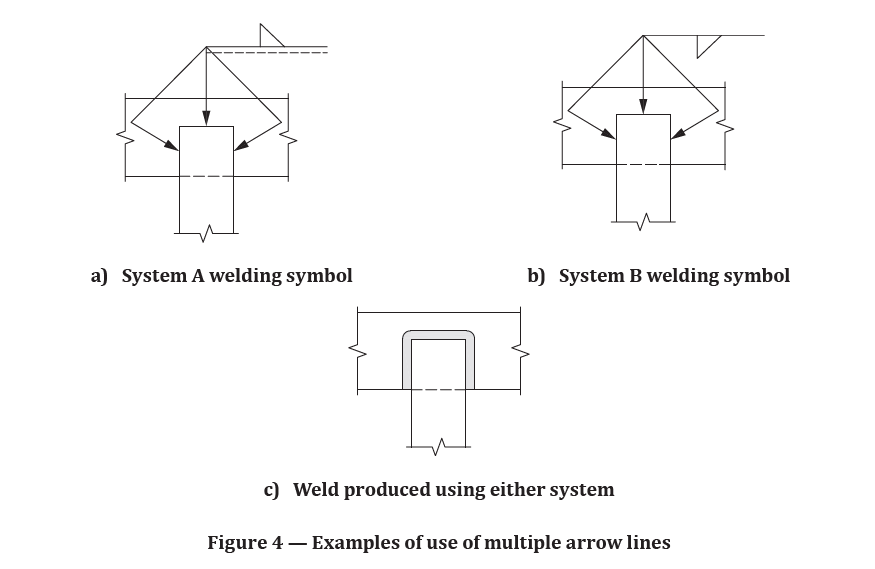
Two or more arrow lines can be combined with one reference line to indicate two identical welds.
For butt joints in plates (excluding T-joints), when the preparation of a specific joint member is required, the arrow line has a break and points towards that member. This might include single-bevel or single-J butt welds.
If it is obvious, or there is no preference as to which member is prepared, the arrow line need not be broken (see Figure 4).

4. Reference line
The reference line indicates which side of the joint the weld is to be made.
In System A, it consists of two parallel lines of equal length, one continuous and one dashed. Usually, the dashed line goes below. For symmetrical welds, and spot and seam welds at the interface between two components, the dashed line is omitted.
In System B, the reference line is one continuous line.
The 'arrow side' is the side of the joint to which the arrowhead is pointing, and the 'other side' is opposite. The two are always part of the same joint.
In System A, elementary symbols should be located on the continuous line when the weld is to be made on the arrow side, and on the dashed line when it is to be made on the other side.
In System B, elementary symbols go below the reference line for arrow side welds, and above the line for other side welds.
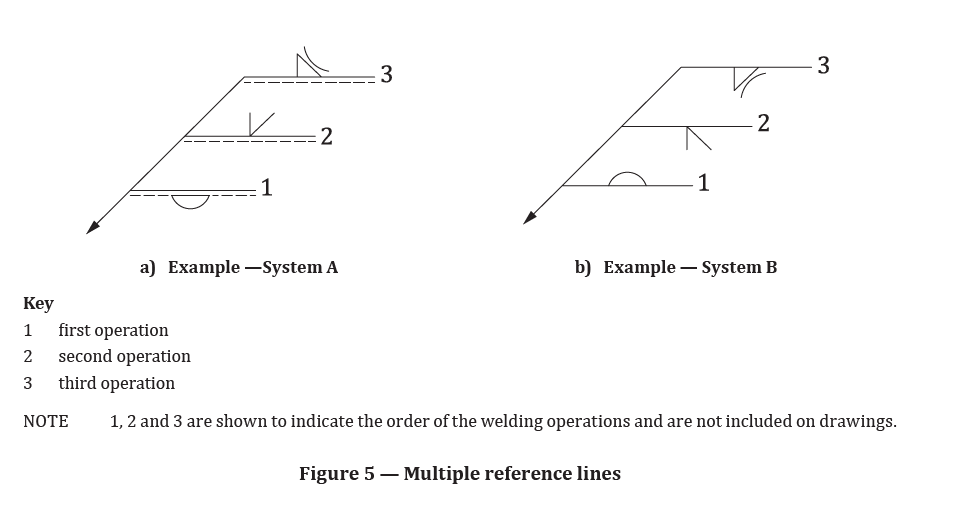
The standard contains full details about the symbols for plug, spot, seam and projection welds; welds between two members; joints with spacers; and multiple reference lines (see Figure 5).

5. Tail
This optional element can be added to the end of the reference line to include additional information about quality level, welding process, filler material, welding position and any other supplementary information. Often, this might be a reference to an ISO standard.
A closed tail is used only to indicate reference to an instruction such as a welding procedure specification or qualification record.
If multiple welding symbols have the same information, this should be put in one single general note on the drawing rather than in tails on each symbol (see Figure 6).

How do I learn more about welding?
To find out what else the standard includes, such as dimensioning of welds and joint preparations, please visit the BSI shop.
A Tracked Changes version of this document is also available at the BSI shop, showing the revisions made to the previous version of the standard.
In addition, the following manufacturing standards have been released this month.
- BS EN 10217-3:2019, Welded steel tubes for pressure purposes – Technical delivery conditions – Part 3: Electric welded and submerged arc welded alloy fine grain steel tubes with specified room, elevated and low temperature properties. (Tracked Changes version available)

 Every profession has its own language, but few seem more mysterious to the uninitiated than that of welders.